Our most popular pattern “The Wayfarer Sling Backpack” has undergone a complete overhaul. The small Wayfarer Backpack was our very first PDF sewing pattern launched on 21st June 2019!! Four years have passed, and our journey has been substantial. We have gained profound insights and have refined our techniques significantly. So, we decided it was high time we updated the Wayfarer to match our current standards!!
What’s new?
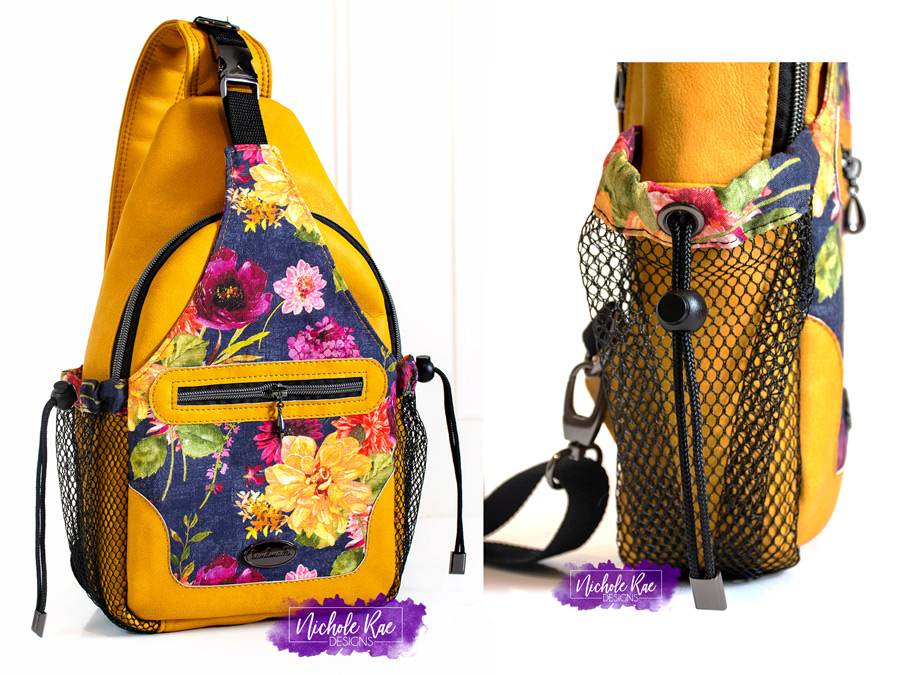
Many of you are wondering what has changed? What new features have been added? This post will answer most of your questions, I hope. First of all, the major difference you are going to see is the front zipper pocket. We changed it from a slanting zipper in the original to a straight zipper with an overlay for a trendier look. Another major noticeable difference is the size. It is still a small sized backpack. However, we’ve increased the depth of the wide gusset to make it roomier and to incorporate bottle holders. The narrow gusset remains the same. The new dimensions are
Style 1: 8” W x 14.5″ H x 3.5” D
Style 2: 8” W x 14.5” H x 4.5” D
Straps:
Another most requested feature we’ve included: ingenious convertible straps, allowing you to seamlessly switch between a single-strap crossbody style or a classic backpack look. The convertible strap has a unique construction technique to prevent the zipper from rubbing against your neck while carrying backpack style. For those of you who prefer a normal sling strap, fret not. An adjustable sling strap is also included with an easier method of construction.
Miscellaneous Pockets:
Similar to the old wayfarer pattern, this update also includes different interior pocket options, like pen/slip pockets, gadget pocket, bottle holders and zipper pockets. However, we have decided to remove the card slot pocket and the mobile pocket after discussions we’ve had with our lovely bagmaker customers.
We’ve also changed the construction of the interior and back zipper pockets for quick and easy zipper pocket installation!! The bottle holder pocket introduces a new technique: grommet installation. If you’ve never tried grommets before, then, make sure you try this out. We have a detailed blog post on how to install grommets: http://aquaintstitch.com/how-to-install-grommets-or-eyelets-on-fabric/
Assembling the Backpack:
Finally we’ve introduced two methods to assemble the backpack: Binding and Birthing. We often see discussions on this topic on social media and decided why not include binding method for those who prefer it. So now you can choose how you want to finish your wayfarer depending on your fabric choice and how stiff your bag is. You can also combine both the techniques.
Pattern Files!! What’s different?
Separate instructions files are provided for each style to avoid confusion. The pattern pieces are provided in a separate document comprising printable full pattern pieces including rectangular pattern pieces.
PDF only and PDF+SVG options are available during purchase. Cut files for use with popular cutting machines, for example, Brother Scan n Cut, are provided in DXF and SVG formats. Note: A 12″ x 24″ mat is required to cut the pattern pieces. Cut files have been thoroughly tested on multiple cutting machines.
However, we cannot provide technical support or assistance in any form for said cut files. Please purchase the cut files only if you are proficient in using your cutting machine.
A0 copy shop files and projector files (new template) have been included as well!!
Skill Level:
Style 1: Intermediate
Style 2: Advanced
Basic Skills Needed:
– Basic sewing skills
– Familiarity with sewing patterns.
– Sewing curved seams
– Installing a zipper
– Determine Interfacing requirements
We hope you enjoy making this new revamped Wayfarer Backpack!!


