
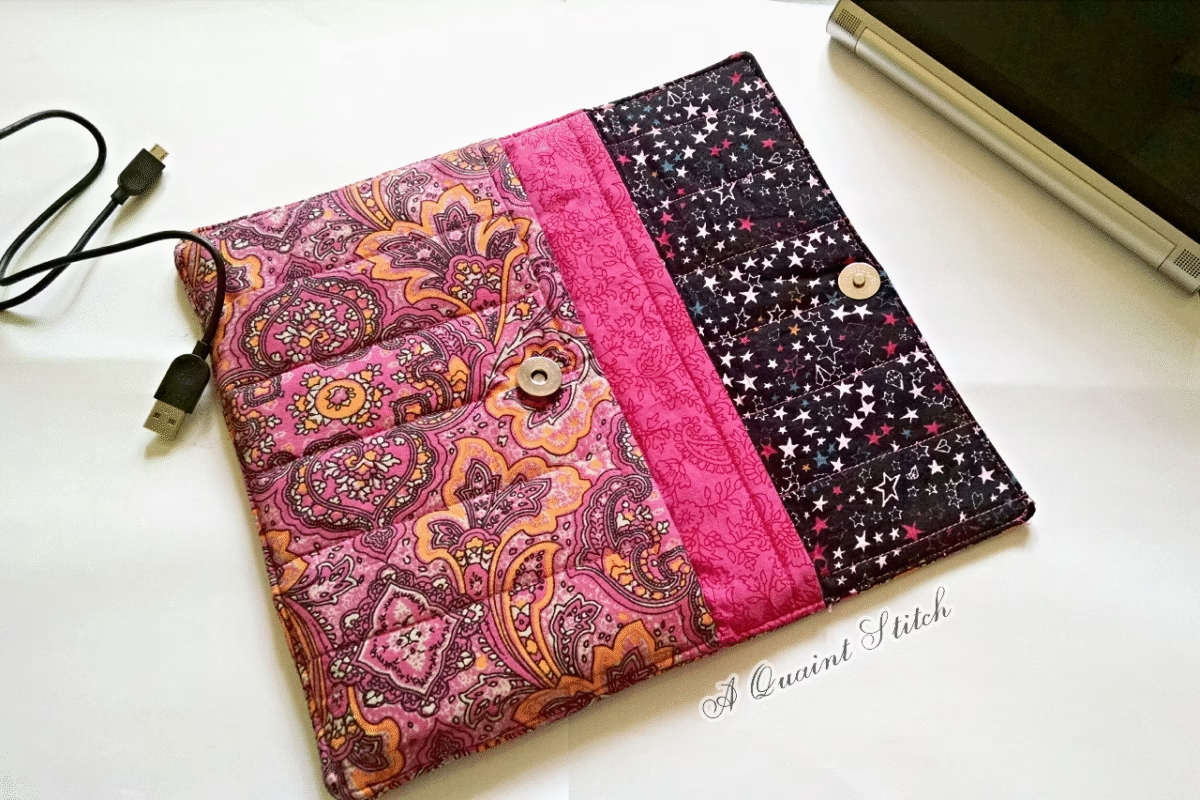
I got a new Lenovo Yoga Tablet last week and decided to make a quilted case for it using some pretty fat quarters. Yes! this is a fat quarter friendly project!!

Looked through Pinterest for inspiration and found a good pattern. I didn’t quite like the tablet patterns existing in the market and decided to just wing it. Turned out pretty good don’t you think 🙂
Here is how I went about making the tablet case:
First I measured my tablet. It is an 8″ Lenovo Yoga Tablet with a battery cylinder and kickstand on the side and measured about 8.5″ w x 6″ h. I added about 2.5″ for ease and seam allowance to get a final measurement of 11″ w x 8.5″ h. Then I derived the other measurements namely the pouch and the flap measurements from this.
Materials Required:
Fabrics: 3 fat quarters of quilting weight cotton or cotton poplin.

Hardware & Notions:
1 Magnetic snap button
1 yard of Cotton batting/foam/fleece
1 yard of woven interfacing
Co-ordinating thread
Cutting Instructions:
From exterior fabric (pink floral):
Cut one Main Panel: 11″ w x 12″ h
Cut one Pocket Panel:11″ w x 6.5″ h
From lining fabric (black stars):
Cut one Main Panel: 11″ w x 12″ h
Cut one Tablet Panel: 11″ w x 8.5″ h
Cut one Pocket Panel: 11″ w x 6.5″ h
From accent fabric (pink):
Cut one Tablet Panel: 11″ w x 8.5″ h
From Cotton batting (Can substitute with foam/fleece):
Cut one 10.5″ w x 11.5″ h piece for Main Panel
Cut one 10.5″ w x 8″ h piece for Tablet Panel
Cut one 10.5″ w x 6″ h piece for Pocket Panel
Woven Interfacing:
Cut two 11″x12″ pieces
Cut two 11″x8.5″ pieces
Cut two 11″x6.5″ pieces
Phew!! That’s a lot of cutting!!!

Prepping:
After cutting, fuse the interfacing pieces to all the cut fabric pieces by ironing the shiny side of the interfacing to the wrong side of the fabric.
Instructions:
1. Sew the Exterior Pocket Panel with the Lining Pocket Panel right sides together along one 11″ side with a 1/2″ seam allowance. Trim the seam allowance by cutting with pinking shears. Repeat to sew the exterior and lining Tablet Panels.

2. Turn both the Pocket Panel and the Tablet Panels right sides out and press well. Set aside the Tablet Panel. Note: Do not top stitch now.
3. Attach the female part of the magnetic snap button about 1″ below the sewn end and in the center of the Pocket Panel making sure that the wrong side of the magnetic snap button is in between the exterior fabric and the lining fabric. I forgot to add the snap at this stage and had to rip open my quilted stitches to attach the snap.

4. Now place the batting for the Pocket Panel in-between the exterior and lining Pocket Panels like a sandwich. Topstitch the seam using a 1/8″ seam allowance. Sew the sandwich in a grid pattern or use any decorative quilting stitch to sew the two fabrics and batting together.
5. Similarly place the batting for the Tablet Panel in between the exterior and Lining Tablet Panels and quilt.

Note: I just stitched them together using straight lines which were about an inch apart.

6. Similarly quilt the batting for the Main Panel to only the Lining Main Panel. As an alternative method you can use fusible fleece/foam instead of batting and fuse the fleece/foam to the wrong side of the Lining Main Panel.
7. Attach the male part of the magnetic snap to the Lining Main Panel about 1.5″ from the top edge and in the center of the 11″ side.
8. Now place the quilted Tablet Panel on the Lining Main Panel aligning the bottom edges and sew along the sides to attach both. Place the quilted Pocket Panel on top of the Tablet Panel, aligning the bottom edges and sew along the sides and the bottom edges.

Note: I added the magnetic snap to the lining fabric after this step and hence it is not seen in the pic above.
9. Place the Exterior Main Panel on top of this sewn piece, right sides together and pin or keep in place using wonder clips.

10. Sew along the edges slowly using a 1/4″ or 1/2″ seam allowance, leaving a big gap along the top edge to turn the case right sides out. Backstitch at both the start and stop points. Note: I placed two pins to indicate the sewing start and stop positions.
11. Trim the seam allowance all around and cut the edges to reduce bulk.
12. Turn the case through the opening slowly. Top stitch all along the edges to seal the opening and the tablet case is ready!!
This post may contain affiliate links. As an Amazon Affiliate, I earn a small commission if you buy the products from these links, at no extra cost to you. But I only recommend products I would use myself.